Sunday, September 12, 2010

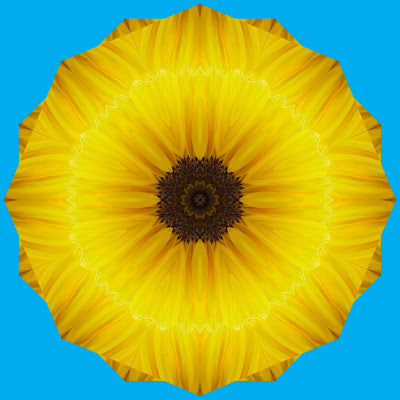
Sunflower Foliage Dodecahedron


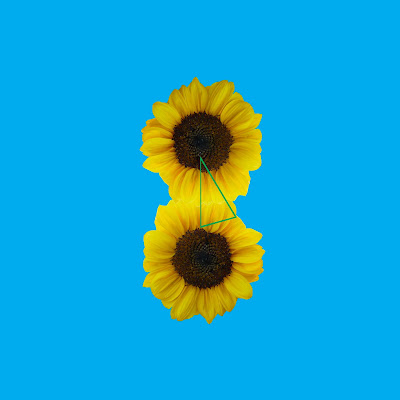
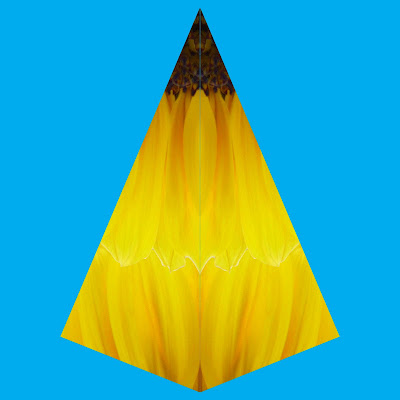
Let's give you one more polygon made with sunflower foliage. To create the triangular cutout, I overlapped several plants so that I could extract a long, narrow triangle with lots of variation along its length. The result is the extra intracacies of this design.
*******
Let's carry this one step further by adding a ring of the whole plants.

Flower Stars


In creating this composite of pink daisies, I created some simple stars with lines of the blossoms. I made them more complex, by taking the 6 pointed star and duplicating and rotating it 30° to create the 12 pointed stars. By putting smaller stars inside of the larger ones, and repeating that process, I came up with even more intricate designs.
*******
I thought it worked very well here, but in experimneting with other flowers; found that it doesn't always work as well. Still, I think it will have usefulness; and perhaps some of you will figure out how to improve the method.
*******
I did use this approach with the sunflowers. I have made several attempts in the past to "spherize" some of my images and have not been satsified with the results. Under Photoshop filters there is a distort funciton. As a subcategory under that is the spherize option. I used it to turn the star complex into a shape wrapped around a virtual sphere. Again, some of you may find more use for this than I have so far managed.

16 Point Star


I include this one because I got the idea to stack several overlapping flowers to create the triangular cutout. That has the potential of adding a lot of complexity to these designs.

Saturday, September 11, 2010

Sunflower Octagon 2 Demo


The bottom page shows the triangular cutout I made from a sunflower. I created a mirror image triangle and formed a diamond shape which I rotated to form the ocatgonal figure you see here. I could have widened the diamonds to make them fit together or narrowed them to make a twelve sided figure. As is, this appears to be a mistake; but I decided to duplicate this figure, and put it behind the first one. I them rotated it 30° to create the top image. You almost can't go wrong with this approach. I could happily spend all my time creating these kinds of designs.

Sunflower Star with 6 Points


Here is another variation of thousands of possibilities.

Friday, September 10, 2010

Sunflower Cutout Demo


Let's demonstrate how to do the flower cutouts and turn one into an octagon. We begin by taking one sunflower and putting it on our design page. We could do a cutout from the single blossom, but we can add some interest and complexity by combining two. The top image shows the outline of our cutout in green.
*******
This is done by choosing the shape tool in Photoshop and selecting the polygon. We set the sides to 3 to create a triangle. We then use the cursor over the flowers to form the triangle. By setting the shape fill to 0% opacity, we can see through our shape. By choosing the move tool with the V shortcut, we are able to reposition our triangle as needed. We can also rotate it and adjust the shape to fit our purposes. We want a long, narrow triangle that takes in a bit of the dark center and as much of a petal section as we can get.
*******
When we have what we want, we click paths in our layer palette and choose make selection, and new selection. With the move tool, we can put it on another page. From there, we duplicate the layer, and flip it horizontally so as to create the diamond shape of the second image.
*******
We then turn it into an octagon, by rotating around a center axis 7 times. We ended up with thin lines at the outer edges where background showed through. The solution is to duplicate the layers, merge them and pull them below the first set in the layers palette. By rotating 22.5°, we fill in behind our gaps and add the set of additional outer points.
*******
We could probably improve on this, but I have yet to come up with something that was ugly using this method. Of course, I will keep trying.

Desing Element Pages and File Organization


I am currently working on sunflower designs. I want to share with you the way I organize my design files. I start by creating a new folder such as Sunflowers. I then create a sub folder labeled extractions. I will further subdivide that into flowers and foliage.
*******
I will add other folders for: mandalas, backgrounds, elements, for design, borders, composites, and arrays. I then create design pages starting with single blossoms, then paired flowers, lines, arcs and other combinations. By bringing up these pages in Photoshop while creating a mandala or array, I can simply drag the elements I need into the page I am working on.
********
Here are pages I have created for working with the sunflowers. The first one shows the 7 flower extracts I started with. Everything else has been created by combininng them. By the time I am done, I will problay have another design page of flower elements and one or two pages of foliage elements.
*******
I am currently using a 1TB external hardrive for backing up my images, but I also have most designs on disc. I find that CD's are not sufficient, so I use DVD RW's to store on disc.
*******
Being organized in storing files is important as you start expanding your inventory. I am constantly going back and taking elements from old designs to create new ones. That is the beauty of digital technology, but it makes it imperative to be able to find things when needed. If anyone has tips to share, I will gladly post them here.

Mandala Array Elements


I have revisited the pink tree bells and created a new mandala and what I call a mandala array in which I create a complex of various elements radiating out from the central mandala. In the process, I created these designs for use in the arrays. They are all made by taking triangular cutouts from photos of flower petals. I then made a dodecagon for the center, stars and diamond shapes. I kept the mandala relatively simple so that it would work well in the array.
*******
I also show an array expanded into a larger pattern which could actually be used for something like wallpaper. It could be expanded as much as necessary. I will show in more detail how to do the array at another time and even provide you with a template for doing so.
*******
The mandala array on the blue background has another innovation. Up until now, I have been using a rectangular grid pattern for the backgrounds. While these are interesting and have many uses; for the mandalas, a radiating pattern makes a lot more sense. See my Emerging Patterns blog for the post of this same date, for more detail on that.

Thursday, September 9, 2010

Using the Pen Tool to Extract Images


This is the most impotant update I have for you at this time. I had shown you using the extract filter and eraser tool to extract flowers from the background in photos. I have now learned to use the pen tool to do the extraction, and it makes things much faster.
*******
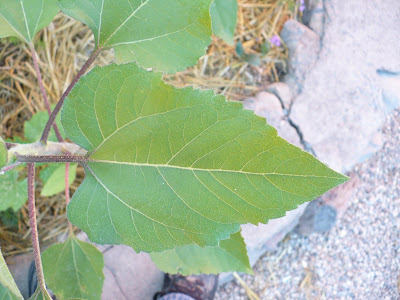
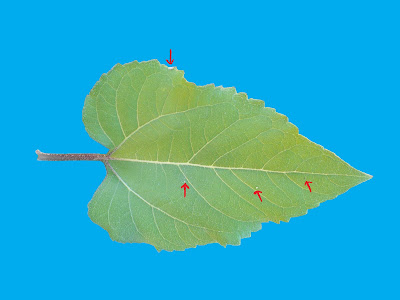
At the top is the original photo of a sunflower leaf. I duplicated the image and labeled the file as needed. We will talk about organization and storage of images at another time.
*******
I begin the extraction by zooming in several times so that I can work at a high resolution. The higher the resolution, the more precise the outline, but the longer it takes to complete the outline, so try to strike a balance here.
*******
I then took the pen tool (short cut = P). You can use a mouse for this and click various points left clicking as you go. With an electronic pen and graphics tablet, it is much faster; and you just touch the pen to the tablet to add outline points. Trace around the outside of the leaf and you will be able to watch the points as you add them.
*******
On the upper right of the layers palette, you can adjust the fill opacity of the mask. If you leave it at 100%, a solid mask will develop as you trace around the leaf. I usually reduce the opacity to zero. There are times when I will use 40% or so. I suggest you experiment with what suits you.
*******
If you place a point off from what you wanted, click the directional tool, A and you can drag a point as needed. You also have add point and subtract point options in Photoshop. If you need to back track, use the history palette to erase a series of points.
*******
When you get back to the start, you will complete a loop which is your whole outline.
Go to top of layers palette and choose paths. Right click on the highlighted bar which appears and choose "make selection". That will bring up a pop up window with options of new selection, and add or subtract from selection. Choose new selection. Your outline will start flashing.
*******
You can lose all your work if you make a wrong move here. There may be other ways of dealing with this. I am new to this mask function myself. and don't understand all the ins and outs of masks, but his works for me.
*******
First, I merge the selection layer down to the background layer. You may also simply merge the two layers.
*******
I then duplicate my image. With the new image, I add a new layer, and then add a new layer from background. I then move the blank layer below the layer with the image. I can now delete the image layer and end up with a blank page. Now I go to the layer with the mask, clik "V", and put my cursor inside of my selection. I can then drag the selction to the blank page. The selection will now be a stable layer on the new page. I can add a layer and give it a solid blue fill to get the image you see next.
*******
I have added some red arrows to indicate points that have blemishes. Touching up photos is a whole other subject, and I am just learning how to do it. One tool to experiment with is the healing brush tool and its cousin the spot healing tool. They can work wonders, but can be tricky to use.
*******
What I did here, is use the eye dropper tool to sample the surrounding color I want to use to fill the blemish area. I then use the brush tool to dab color on the spot. I zoom in to do this, and can sample different colors to fill a large area so as to give a matching kind of texture to the leaf. I can blend the colors with the blur tool, "R". While your fix may not look perfect at high resolution, when you return to normal, your patch will be unnoticeable. One could use this method to turn a photo into a digital painting. I haven't taken the time to do so yet, but plan to in the future. Perhaps you want to beat me to it.
*******
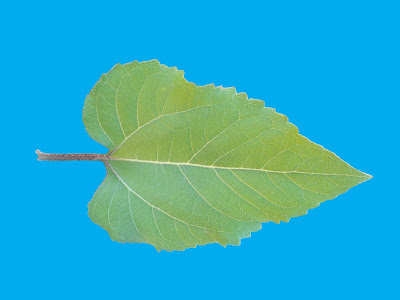
The next image shows the leaf touched up. Not bad, eh?
*******
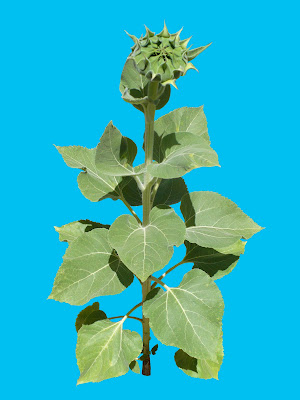
Things get more complicated when you have an image like the whole plant in the next image. The open spaces in the middle present another challenge. There may be a more efficient method of doing this, but this is what I have come up with. As always, I am grateful to recieve tips on improving my mehtods.
*******
Begin by outlining the whole plant and making your selection as before. Move it to a new page to stabilize it, and you can start extracing the areas where the background shows through. To do this, outline with the pen tool one of the "holes". Here, I use a 40-60% opacity and choose a contrasting color so that my mask shows up, but I can see through to do my tracing. Make it a new selection, and outline another hole. This time, choose "add to selection". In a complex image like this, I will do several outlines, and add selections. I will then go to layers and merge layers into background.
*******
If you have your mask opacity strong enough, you can take the magical eraser tool and click on a selection, and it will disappear. The background will show through. Repeat with each outlined hole, and watch the magic. With a complex image, I will continue to do a few outlines at a time. In extracting a whole ocitillo plant this way, I ended up with 225 seperate selections. That took awhile, but it saved me time over doing it with the eraser tool.

Tutorial Update

It has been awhile since I updated this tutorial, but there are quite a few things I need to add.
*******
I am exploring ways to turn these tutorial into videos which can actually show the computer screen as I am working. As I get this done, I will post them on You Tube. If anyone knows how to do this, I would appreciate your tips.
*******
My oldest son works in animation, and I plan to eventually animate my mandalas and set them to music. I know that he uses a software program called Maya to create his animations. As I learn how to do that, I will share it with you as well.
*******
On thing that Chris has done in instructing me is to show me how to perform Photoshop functions on Skype. It is a great over the internet phone service that provides free computer to computer phone service. Add a webcam, and you have video calls. When he lived in New Zealand working on Avatar, it was a great service because normal phone calls were too expensive to the States.
*******
A great feature of Skype is that it allows you to see the other person's computer screen and vice versa; so Chris has been able to show me new things, and I could watch his cursor move and so on. It makes it easy to follow along and see exactly how it is done. IF YOU WANT ME TO SHOW YOU ANY OF THESE PROCEDURES THIS WAY, I AM WILLING TO DO SO. Just sign up for Skype and e mail me about a mutually convenient time to do a lesson.
*******
Earlier, I showed you to use the grid to help position items on a mandala, and there are times when it can be helpful; but I have found it distracting and unecessary most of the time, so I work without it now.
*******
The important thing is to have the gridlines accurately aligned so that you have your page center to work with. I will zoom in a lot and make sure that my center is precise.
*******
The other little trick here is to create your page and fill it with a solid color. Click V to get the move tool, and Photoshop will show you the center of the page.
*******
When placing a new element for a ring, simply position it where you want it; say at the top of a ring. Then duplicate the layer, rotate it 180° and nudge it down to what looks like an equal distance from the center. Shift, click to highlight both layers and press V. You will see a square around the 2 layers with the midpoint in the center. Simply nudge the layers with the up & down arrows until they are aligned with the center.
*******
As you rotate new elements to form the rings, work in the same way to center each new addition or set of additions. EVERY SO OFTEN AS I ADD RINGS, I WILL ZOOM IN WHILE HIGHLIGHTING EACH RING LAYER, TO SEE IF IT IS STILL CENTERED PRECISELY. If I have 8 rings, I will check alignment of each before adding the ninth. If you notice new elemnts not lining up right, check this point.
*******
Since my last update, I have also learned how to download free fonts from the internet so that I have been able to expand the number of fonts available for use in Photoshop. Your operating system may work differnetly than mine, so I am not going to go into detail here. If you need assistance, let me know.
*******
In an earlier post, I showed you how to make butterly paintings. I have recently learned a technique for drawing the lines that works well for me. For some images, a variable line is wanted and the pressure sensitive drawing tablet is an amazing piece of equipment that makes that possible. For many of my outlines, however, I want perfectly even lines.
*******
In order to do that, I zoom up to a high resolution and do a shift click with my mouse to create a short straight line. I continue shift clicking to extend the line to create my outline. When I zoom out to normal resolution, the lines blend together to create graceful curves or whatever else I need.
*******
I suspect that there is a way to use the pen tool this way, but I haven't worked that out yet. As always, if someone wants to clue me in, I am ready.