I have just completed my first animated tutorial. It is still rough, but good enough to be helpful; and I will be able to improve upon it with future productions. I am giving you the link to its You Tube site.
Sunday, April 3, 2011
Monday, February 21, 2011
Ring of Love

This star is made with hollyhock flowers. I created it just in time for Valentine's Day next year. If any of you need help wrapping text around a circle, let me know. I use it a lot.
*******
I have not done it here, but it occurs to me that if you want, you could improve these designs by digitally painting over them. Just create another layer to work with and merge it down when you are satisfied. You could also overlay other photographic elements to make more sophisticated images. I may go there eventually, but for now; I like the surprise elements and prefer to keep it natural.
*******
I look at what I do as a launching pad from which many of you will take off in directions I wouldn't think of. Enjoy the adventure.
Monday, October 25, 2010
2010 Christmas Cards


The bottom image shows a composite design I made from photos of succulent plant we have in our yard. I finally identified it as an ice plant. It grows well here in Tucson, and has pretty little red flowers, so I thought it would work well for holiday creations. This image could work well for a calendar or placemat.
*******
The middle image is my Christmas card for 2010 with the Merry Christmas salutation. The top image is an alternate version with a Season's Greetings salutation.
*******
RERERENCE: i144,145,146 t117
Saturday, October 23, 2010
Loa Tzu Quote on Still Mind

Brian posted this on facebook a couple of weeks ago and I use it here with a star made from succulent foliage. I posted in as this week's illustrated thought on my Tidbits From Tucson blog. I am posting it here to add the text to our list. I am not referencing the star, as it is used as an element in larger designs and is not meant to stand by itself. If you ever want a print made with one of these star designs, I would be happy to fill your order.
*******
REFERENCE: t117
Thursday, October 21, 2010
Flower Outline Stars


There is a soc/rec program here that makes their own Christmas cards every year to send to its members. Last year, I offered to let them use my Christmas Cactus design, but they declined because it was full color and would have used to much ink. So this year, I wanted to offer them something more cost efficient, and created this black & white star using outlines of cosmos flowers.
*******
I don't know if they will use it, but in the process; I developed a technique which will have wide applications. There are endless possibilities here for beautiful and interesting designs. The top image shows that these can be colorized. This could be useful for t shirts, where the detail in some of my complex photographic designs doesn't work so well. I like making t shirts because it is fun to combine the images with sayings, but some of my designs don't translate well to fabric, so this may be a solution.
*******
One could create these stars using the outlines of all kinds of textures and objects, but the idea of using flowers works especially well for me. One could also use freehand lines and shapes; as well as all kinds of geometric patterns, shapes, and designs.
*******
The other new technique I developed here was a new way of doing fills. I have tried several ways, and ones which give you a separate color fill as a layer are nice in that they are easy to change with color overlay. I used that method with the butterflies as demonstrated earlier.
*******
Here, I created the outline and then merged it down with a white or colored solid background. I then used the magic eraser to remove the color around the star. That gives me the star as a separate layer. By saving the outline in an original file as a separate layet, I can repeat the process to get any color I want.
*******
This is important, because if you try to overlap flowers to make the triangular cutouts, the lines overlap. Sometimes, that can create interesting patterns, but it can also create a mess.
*******
So experiment and see what you can come up with. You can bet I will.
Sunday, September 12, 2010
Sunflower Foliage Dodecahedron


Let's give you one more polygon made with sunflower foliage. To create the triangular cutout, I overlapped several plants so that I could extract a long, narrow triangle with lots of variation along its length. The result is the extra intracacies of this design.
*******
Let's carry this one step further by adding a ring of the whole plants.
Flower Stars


In creating this composite of pink daisies, I created some simple stars with lines of the blossoms. I made them more complex, by taking the 6 pointed star and duplicating and rotating it 30° to create the 12 pointed stars. By putting smaller stars inside of the larger ones, and repeating that process, I came up with even more intricate designs.
*******
I thought it worked very well here, but in experimneting with other flowers; found that it doesn't always work as well. Still, I think it will have usefulness; and perhaps some of you will figure out how to improve the method.
*******
I did use this approach with the sunflowers. I have made several attempts in the past to "spherize" some of my images and have not been satsified with the results. Under Photoshop filters there is a distort funciton. As a subcategory under that is the spherize option. I used it to turn the star complex into a shape wrapped around a virtual sphere. Again, some of you may find more use for this than I have so far managed.
16 Point Star
Saturday, September 11, 2010
Sunflower Octagon 2 Demo


The bottom page shows the triangular cutout I made from a sunflower. I created a mirror image triangle and formed a diamond shape which I rotated to form the ocatgonal figure you see here. I could have widened the diamonds to make them fit together or narrowed them to make a twelve sided figure. As is, this appears to be a mistake; but I decided to duplicate this figure, and put it behind the first one. I them rotated it 30° to create the top image. You almost can't go wrong with this approach. I could happily spend all my time creating these kinds of designs.
Friday, September 10, 2010
Sunflower Cutout Demo


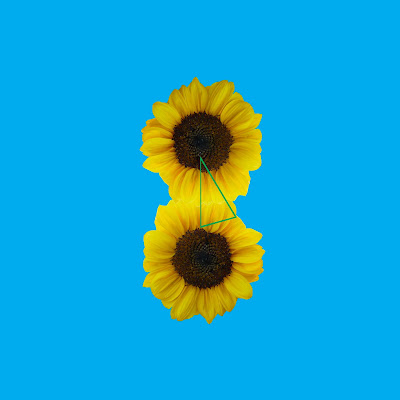
Let's demonstrate how to do the flower cutouts and turn one into an octagon. We begin by taking one sunflower and putting it on our design page. We could do a cutout from the single blossom, but we can add some interest and complexity by combining two. The top image shows the outline of our cutout in green.
*******
This is done by choosing the shape tool in Photoshop and selecting the polygon. We set the sides to 3 to create a triangle. We then use the cursor over the flowers to form the triangle. By setting the shape fill to 0% opacity, we can see through our shape. By choosing the move tool with the V shortcut, we are able to reposition our triangle as needed. We can also rotate it and adjust the shape to fit our purposes. We want a long, narrow triangle that takes in a bit of the dark center and as much of a petal section as we can get.
*******
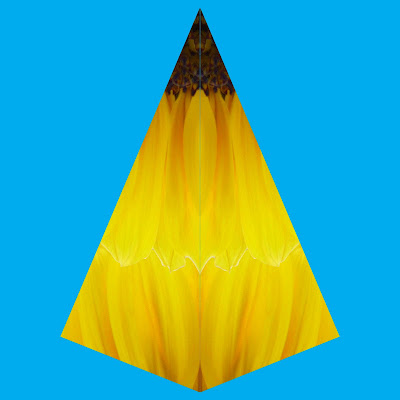
When we have what we want, we click paths in our layer palette and choose make selection, and new selection. With the move tool, we can put it on another page. From there, we duplicate the layer, and flip it horizontally so as to create the diamond shape of the second image.
*******
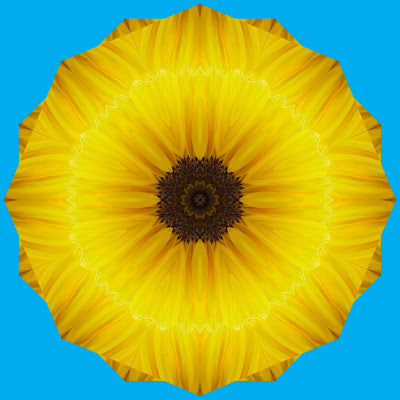
We then turn it into an octagon, by rotating around a center axis 7 times. We ended up with thin lines at the outer edges where background showed through. The solution is to duplicate the layers, merge them and pull them below the first set in the layers palette. By rotating 22.5°, we fill in behind our gaps and add the set of additional outer points.
*******
We could probably improve on this, but I have yet to come up with something that was ugly using this method. Of course, I will keep trying.
Desing Element Pages and File Organization


I am currently working on sunflower designs. I want to share with you the way I organize my design files. I start by creating a new folder such as Sunflowers. I then create a sub folder labeled extractions. I will further subdivide that into flowers and foliage.
*******
I will add other folders for: mandalas, backgrounds, elements, for design, borders, composites, and arrays. I then create design pages starting with single blossoms, then paired flowers, lines, arcs and other combinations. By bringing up these pages in Photoshop while creating a mandala or array, I can simply drag the elements I need into the page I am working on.
********
Here are pages I have created for working with the sunflowers. The first one shows the 7 flower extracts I started with. Everything else has been created by combininng them. By the time I am done, I will problay have another design page of flower elements and one or two pages of foliage elements.
*******
I am currently using a 1TB external hardrive for backing up my images, but I also have most designs on disc. I find that CD's are not sufficient, so I use DVD RW's to store on disc.
*******
Being organized in storing files is important as you start expanding your inventory. I am constantly going back and taking elements from old designs to create new ones. That is the beauty of digital technology, but it makes it imperative to be able to find things when needed. If anyone has tips to share, I will gladly post them here.
Mandala Array Elements


I have revisited the pink tree bells and created a new mandala and what I call a mandala array in which I create a complex of various elements radiating out from the central mandala. In the process, I created these designs for use in the arrays. They are all made by taking triangular cutouts from photos of flower petals. I then made a dodecagon for the center, stars and diamond shapes. I kept the mandala relatively simple so that it would work well in the array.
*******
I also show an array expanded into a larger pattern which could actually be used for something like wallpaper. It could be expanded as much as necessary. I will show in more detail how to do the array at another time and even provide you with a template for doing so.
*******
The mandala array on the blue background has another innovation. Up until now, I have been using a rectangular grid pattern for the backgrounds. While these are interesting and have many uses; for the mandalas, a radiating pattern makes a lot more sense. See my Emerging Patterns blog for the post of this same date, for more detail on that.
Subscribe to:
Posts (Atom)


