 This gets a little tricky with the parts that go off the page, but you'll be able to figure that out.
*******
This kind of background is something I am sure to use again.
This gets a little tricky with the parts that go off the page, but you'll be able to figure that out. I think you will agree that it is much better than this.
 I added flowers inside the star points and darkened the background. I think this is an improvement.
 We have one other option before class is dismissed. Here, I have superimposed text over part of the image. This is especially useful for card designs.


 This completes the mandala itself, but we could keep going and add more rings, more elements and more complexity if we wanted. Our mandala has expanded beyond the sides of the page, but it is a simple matter to scale it down to fit. If we wanted to add another ring or two, we would scale this down as needed first.
 We now take 4 flowers and create what I call a "line element". Arrange the flowers in a line as seen above and overlap them to create the line. Play with it until you get a design you like. You can then duplicate your image and flip it horizintally so that you have a pair to work with.
 How about we add a smaller ring of flowers and layer it behind the ring of 24? Now we have a double ring with 48 blossoms. Are you starting to get the picture and see the potential in all this?
 The mandala designs are about repitition and symmetry, but we need to add interest by breaking up the sameness and incorporating some elements of surprise.
 Duplicate layer, then go to edit>transform. You can rotate 180° or flip vertically. You could drag the duplicated layer to the bottom of the cross and it would be quick, but I usually use the arrow keys, because it maintains one axis of movement, which aides in positoning. So use the down arrow until you have your duplicate layer in positon. Use your grid lines to help in this.
 I am filling the background with cyan. We can and probably will change the background at the end. Use whatever color pleases you.
 We could, of course, combine these flowers with other kinds of flowers, portraits, figures, geometric designs, animals and all kinds of other images to create an infinity of designs. You could take one or two flowers and put them into a woman's hair for a portrait. Use your imagination.
 I make a note that I have adjusted the hue to a minus 32. This gives us two images of different hue which is going to add interest to our final image. Now, we can go back to extract 1 and create a lavender duplicate of that.
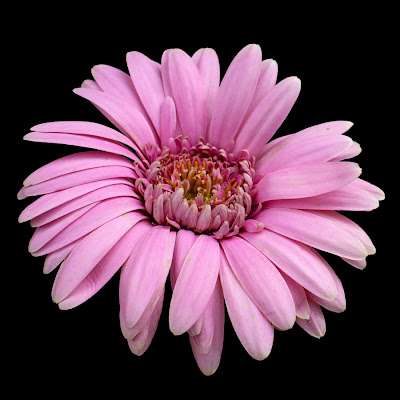 Getting more color intensity is usually my goal, but I don't like to push until it becomes unnatural. The other choices under adjustments include brightness, contrast and so on, but I find saturation to be the biggest help.
![]() I use the eyedropper tool ( I ) to sample the color next to the spot and then use the brush tool (B ) to paint over the spot. That works well much of the time. The healing brush also works, but I find the spot healing tool to work the best ( J ). Simply select that tool and brush over the spot lightly. You may need to use a combination of these to clean up the whole image.
I use the eyedropper tool ( I ) to sample the color next to the spot and then use the brush tool (B ) to paint over the spot. That works well much of the time. The healing brush also works, but I find the spot healing tool to work the best ( J ). Simply select that tool and brush over the spot lightly. You may need to use a combination of these to clean up the whole image.
*******
The other shortcut I use is X. With that, you can switch back and forth between the foreground and background colors. It is especially useful with a black & white image, but I often paint or fill 2 colors at a time because this is so helpful.
*******
The healing brush & spot healing brush don't work well near defined edges, so I usually have to use the brush tool in those areas. Quite often, my flower photos will have an insect on a petal, and this method works well for removing them as well. Better than pesticides.
 I am giving a lot of detail in the tutorial, but I necessarily skip over some steps. If you have trouble with something and need more detailed instruction, e mail me and I will be happy to respond.
 I understand that you CS3 users have other, powerful tools at your command. The process here in Photoshop, is very similar in Corel Photo/Paint. I have not worked with other programs, but there are other options out there.

 I then go to filters and choose extract using Photoshop CS2. You could take a lot of time to outline in detail. You could also use the "smart tool" function, but I find it kind of dumb; or maybe I'm just too dumb to use it correctly. I also understand that you lucky CS3 users have new options which are impressive.
 The image has been touched up, color adjusted and put onto the cyan background. So let's see how this is done.
 My aim in this tutorial is to share a process I have discovered largely by accident. I seem to have stumbled onto something unique for I don't see others doing a similar thing. I don't know why others aren't doing this. To my mind the results are beautiful and we are starting with the beauty of nature, so how can we miss?
 The other recommendation I have is to take pictures of flowers in shade whenever possible. In full sun, you get spots that will white out. Getting shade here in Tucso can be a problem, so when we get a cloudy day, I am out with my camera whenever possible.
 In this tutorial, I am going to concentrate on the mandala. It will give you the skills you need to create the other products. If you ran into specific problems or had questios about creating other products, I wil be happy to help.
 One can create more interesting designs by using photos of different flowers with contrasting shapes and colors or shades of color. As you will see, however, we can get a very pleasing composition with these simple elements.
 This is the first of the 5 photos we are going to use to create our mandala. It is taken with a digital camera and downloaded to my computer.